
最近碰到一個情境是:
- 前端:React.js SPA
- 後端:Django Rest Framework(DRF)
- 使用 Google 登入,讀取特定使用者的資料
在前後端分離的狀況下,沒辦法透過 Django 內建的 session,管理使用者的登入功能。雖然有很多 DRF 相關的登入套件,但經過幾天的踩雷之後,發現有些存在著一些問題,所以就自己簡單實作了一下 Google Login。
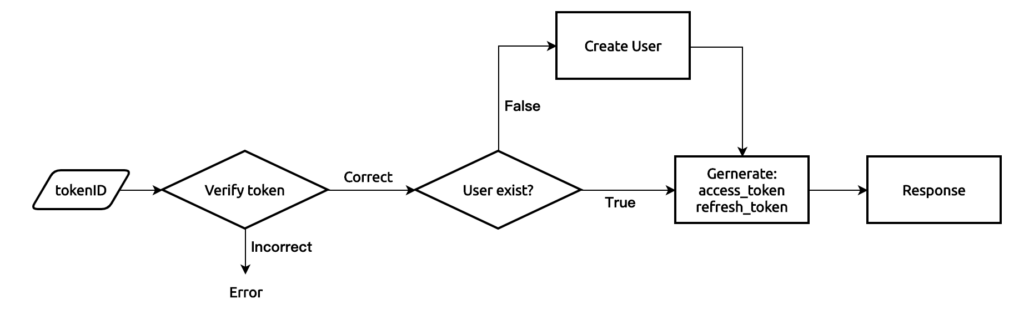
大致的流程
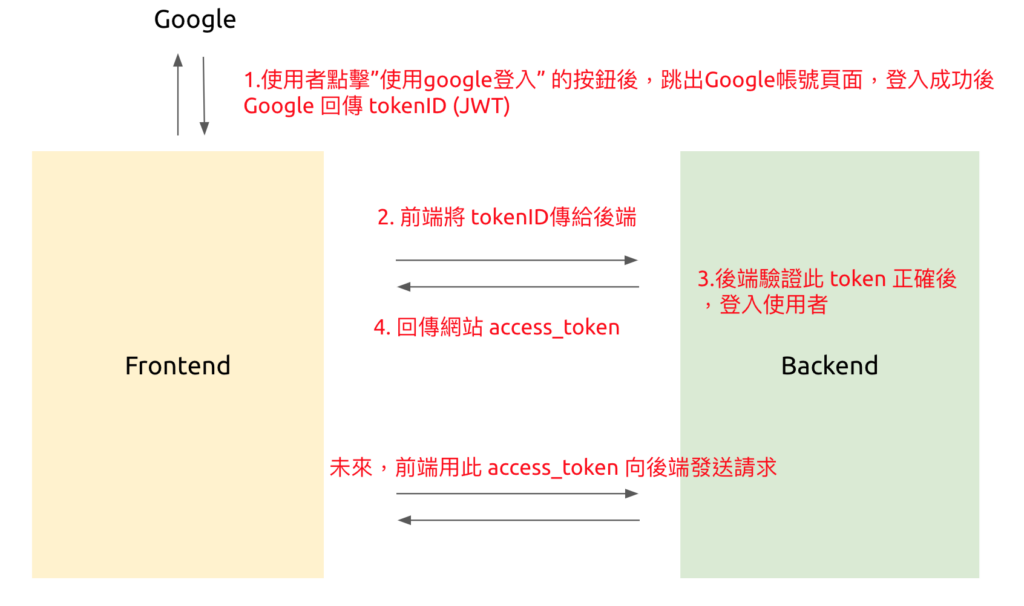
- 前端提供按鈕,使用者按了之後,會跳出 Google 自己的登入視窗,登入之後會回傳一組 tokenID
- 將這組 token 傳給後端
- 後端做驗證此 token 正確性,建立或存取 User,產生一組 API token
- 將網站的 API token 回傳給前端
- 未來前端需要帶著 API token 才能使用 API。
Prerequirement
Integrating Google sing-in for Websites
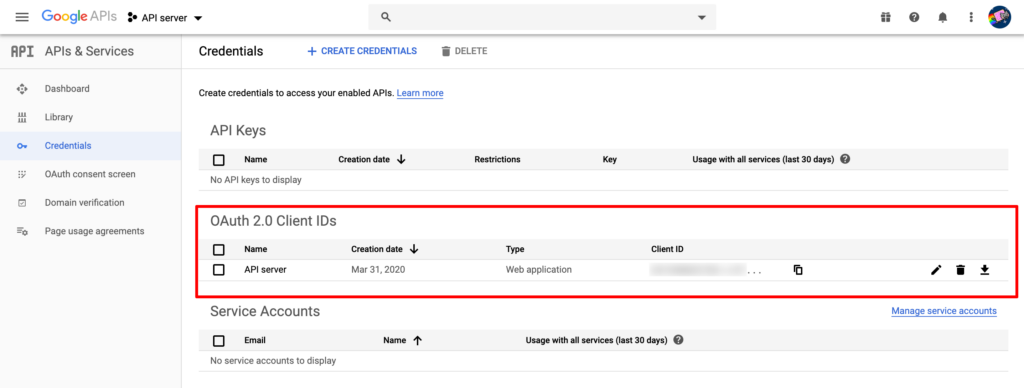
Google API console
- 先向 Google 申請一個 project 並拿到
Client ID
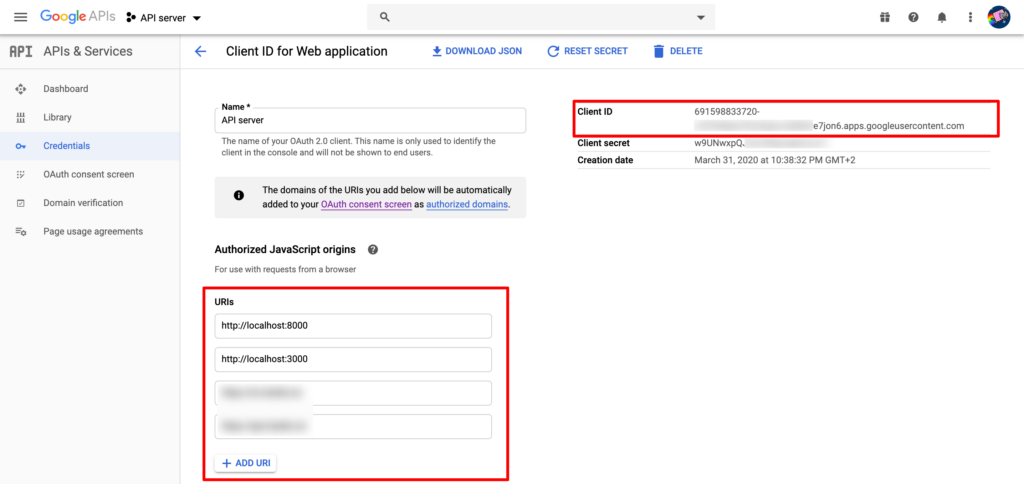
- 在 URIs 的地方新增,
http://localhost:3000此為你的前端的 URI。必須要設定這個 whitelist 才能讓網站使用 Google 登入。
Frontend
在這裡先新增一個登入的按鈕,這個按鈕按了之後會跳出 Google 登入頁面,登入成功會回傳一個組資料,其中的 tokenID 是要拿來登入後端的 token。
Integrating Google Sign-In into your web app
$ npm install react-google-loginimport React from "react";
import GoogleLogin from "react-google-login";
export const SocialLogin = () => {
const responseGoogle = (response) => {
console.log(response)
// send request to backend
};
return (
<>
<GoogleLogin
clientId="<CLIENT_ID>.apps.googleusercontent.com"
buttonText="使用 Google 登入"
onSuccess={responseGoogle}
onFailure={responseGoogle}
cookiePolicy={"single_host_origin"}
/>
</>
);
};
// tokenID jwt decode 後的東西

{
  // These six fields are included in all Google ID Tokens.
  "iss": "https://accounts.google.com",
  "sub": "110169484474386276334",
  "azp": "1008719970978-hb24n2dstb40o45d4feuo2ukqmcc6381.apps.googleusercontent.com",
  "aud": "1008719970978-hb24n2dstb40o45d4feuo2ukqmcc6381.apps.googleusercontent.com",
  "iat": "1433978353",
  "exp": "1433981953",

  // These seven fields are only included when the user has granted the "profile" and
  // "email" OAuth scopes to the application.
  "email": "testuser@gmail.com",
  "email_verified": "true",
  "name": "Test User",
  "picture": "https://lh4.googleusercontent.com/-kYgzyAWpZzJ/ABCDEFGHI/AAAJKLMNOP/tIXL9Ir44LE/s99-c/photo.jpg",
  "given_name": "Test",
  "family_name": "User",
  "locale": "en"
}
Backend
Rest Framework 的設定就不再贅述,我是用 JWT Authentication,以下這篇文章清楚的解釋如何設定 JWT。djangorestframework-simplejwt這個套件預設是用 username+password 登入,所以我們只需要修改一點 code 來建立一個接收 tokenID 的 API 給前端。
110% Complete JWT Authentication with Django & React - 2020
Authentication Django Rest Framework
Flow
Authenticate with a backend server
$ pip install djangorestframework
$ pip install djangorestframework-simplejwt
$ pip install django-cors-headers
# my_projects/settings.py
INSTALLED_APPS = [
# ...
'accounts'
'rest_framework',
'corsheaders',
]
SOCIAL_GOOGLE_CLIENT_ID = '<CLIENT_ID>.apps.googleusercontent.com'
# Rest framework settings
REST_FRAMEWORK = {
'DEFAULT_PERMISSION_CLASSES': [
'rest_framework.permissions.IsAuthenticated',
],
'DEFAULT_AUTHENTICATION_CLASSES': ('rest_framework_simplejwt.authentication.JWTAuthentication',)
}
# CORS header
CORS_ORIGIN_WHITELIST = [
"http://localhost:3000",
]建立 SocialAcoount 的 model 主要是用來建立 Google id -> User 之間的連結。
# accounts/models.py

from django.db import models
from django.contrib.auth.models import User

class SocialAccount(models.Model):
    provider = models.CharField(max_length=200, default='google') # 若未來新增其他的登入方式,如Facebook,GitHub...
    unique_id = models.CharField(max_length=200)
    user = models.ForeignKey(
        User, related_name='social', on_delete=models.CASCADE)
Serializer 在建立使用者的時候驗證傳入的 tokenID 是否正確。如果使用者不存在,就建立一個使用者。在這個情境中,我的網站只有要讓使用者以 Google 登入,所以 Username 可以自己隨便設,但必須是唯一的,未來用 first_name+last_name 來顯示全名就好。
# accounts/serializers.py

from django.contrib.auth.models import User
from rest_framework import serializers
from google.oauth2 import id_token
from google.auth.transport import requests

from api.settings import SOCIAL_GOOGLE_CLIENT_ID
from accounts.models import SocialAccount

class SocialLoginSerializer(serializers.Serializer):
    token = serializers.CharField(required=True)

    def verify_token(self, token):
        """
        驗證 id_token 是否正確

        token: JWT
        """
        try:
            idinfo = id_token.verify_oauth2_token(
                token, requests.Request(), SOCIAL_GOOGLE_CLIENT_ID)
            if idinfo['iss'] not in ['accounts.google.com', 'https://accounts.google.com']:
                raise ValueError('Wrong issuer.')
            if idinfo['aud'] not in [SOCIAL_GOOGLE_CLIENT_ID]:
                raise ValueError('Could not verify audience.')
            # Success
            return idinfo
        except ValueError:
            pass

    def create(self, validated_data):
        idinfo = self.verify_token(validated_data.get('token'))
        if idinfo:
            # User not exists
            if not SocialAccount.objects.filter(unique_id=idinfo['sub']).exists():
                user = User.objects.create_user(
                    username=f"{idinfo['name']} {idinfo['email']}", # Username has to be unique
                    first_name=idinfo['given_name'],
                    last_name=idinfo['family_name'],
                    email=idinfo['email']
                )
                SocialAccount.objects.create(
                    user=user,
                    unique_id=idinfo['sub']
                )
                return user
            else:
                social = SocialAccount.objects.get(unique_id=idinfo['sub'])
                return social.user
        else:
            raise ValueError("Incorrect Credentials")

class UserSerializer(serializers.ModelSerializer):
    class Meta:
        model = User
        fields = ['username', 'email', 'first_name', 'last_name']
get_tokens_for_user() 將產生一個對應該 User 的 JWT 。
- access_token: 時效短,每次前端 request 時必須加在 Header 中,不然會得到
401 unauthorizedError. - refresh_token: 時效長,當 access_token 過期後,拿著這個 token 來交換新的 access_token
# accounts/views.py

from rest_framework.permissions import AllowAny
from rest_framework.response import Response
from rest_framework_simplejwt.tokens import RefreshToken
from rest_framework_simplejwt.views import TokenObtainPairView

from accounts.serializers import SocialLoginSerializer

def get_tokens_for_user(user):
    refresh = RefreshToken.for_user(user)
    return {
        'refresh': str(refresh),
        'access': str(refresh.access_token),
    }

class GoogleLogin(TokenObtainPairView):
    permission_classes = (AllowAny, ) # AllowAny for login
    serializer_class = SocialLoginSerializer

    def post(self, request):
        serializer = self.get_serializer(data=request.data)
        if serializer.is_valid(raise_exception=True):
            user = serializer.save()
            return Response(get_tokens_for_user(user))
        else:
            raise ValueError('Not serializable')
# accounts/urls.py
from django.urls import path
from rest_framework_simplejwt import views as jwt_views
from accounts.views import GoogleLogin
urlpatterns = [
path('token/obtain/', GoogleLogin.as_view()),
path('token/refresh/', jwt_views.TokenRefreshView.as_view(), name='token_refresh'),
]# my_projects/urls.py
from django.urls import path, include
urlpatterns = [
# ...
path('accounts/', include('accounts.urls')),
]前後端串起來
前端的按鈕和後端的 API 都準備好之後,就照著一開始的 flow 把他串起來。
// ...
import axios from "axios";

export const SocialLogin = () => {
  const responseGoogle = (response) => {
    console.log(response);
    // Send request to backend
    axios
      .post("http://localhost:8000/accounts/token/obtain/", {
        token: id_token,
      })
      .then((res) => {
        console.log(res.data);
        // 拿到的 token 存在 localStorage
        localStorage.setItem("access_token", res.data.access);
        localStorage.setItem("refresh_token", res.data.refresh);
      })
      .catch((err) => {
        console.log(err);
      });
  };
  return (
    <>
      <GoogleLogin
        clientId="<CLIENT_ID>.apps.googleusercontent.com"
        buttonText="使用 Google 登入"
        onSuccess={responseGoogle}
        onFailure={responseGoogle}
        cookiePolicy={"single_host_origin"}
      />
    </>
  );
};
當未來要存取 API 資料時,header 要加上 Authorization:Bearer <access_token>。底下的程式碼是當此次 Request 中的 Access token 過期之後,自動拿 refresh_token 去換新的 access_token。
import axios from "axios";

const axiosAPI = axios.create({
  baseURL: "http://localhost:8000",
  headers: {
    Authorization: "Bearer " + localStorage.getItem("access_token"), // 帶著 access token
    "Content-Type": "application/json",
    accept: "application/json",
  },
});

axiosAPI.interceptors.response.use(
  (response) => response,
  (error) => {
    const originalRequest = error.config;
    if (error.response.status === 401 && error.response.statusText === "Unauthorized") {
      // access token -> 向 API 拿新的 token
      const refresh_token = localStorage.getItem("refresh_token");
      return axios
        .post("http://localhost:8000/accounts/token/refresh/", { refresh: refresh_token })
        .then((response) => {
          localStorage.setItem("access_token", response.data.access);
          axiosAPI.defaults.headers["Authorization"] = "Bearer " + response.data.access;
          originalRequest.headers["Authorization"] = "Bearer " + response.data.access;
          return axiosAPI(originalRequest);
        })
        .catch((err) => {
          // refresh token 過期 -> 直接當作完全沒有登入
          localStorage.removeItem("refresh_token");
          window.location.href = "/login";
        });
    }
    return Promise.reject(error);
  }
);

export default axiosAPI;
import axiosAPI from "./axiosApi";
export const fetchData = (dispatch) => {
const token = localStorage.getItem("access_token");
axiosAPI.get("/todos/").then((res) => {
console.log(res.data);
});
};Note:
這不是一個 Step-by-step 的教學,我省略了一些基礎,如:virtualenv 設定, migrate, runserver… 等等有基礎知識的人都會理解的步驟。
參考&額外資料
- Introduction to JSON Web Tokens
- 110% Complete JWT Authentication with Django & React - 2020
- Using Axios with React
- How to Integrate OAuth 2 Into Your Django/DRF Back-end Without Going Insane
- How to implement all needed auth endpoints including login with OAuth2 for a SPA using Django REST framework, django-rest-auth and django-allauth
- Django Rest Framework
- Django CORS header
- django-rest-framework-simplejwt
- django-allauth