
有一天副連長很匆忙的跑到連上問有沒有電機系和資工系會寫程式和接電線的人,原本以為是簡單的公差,但後來衍生成滿麻煩的任務…營長想要做一個酷酷的裝置,可以在夜射的時候控制整個靶場的燈光,就算剩下 3 週就退伍了,為了完成營長(兩顆梅花)好大喜功的交辦事項,還是硬著頭皮被抓去營長室了。
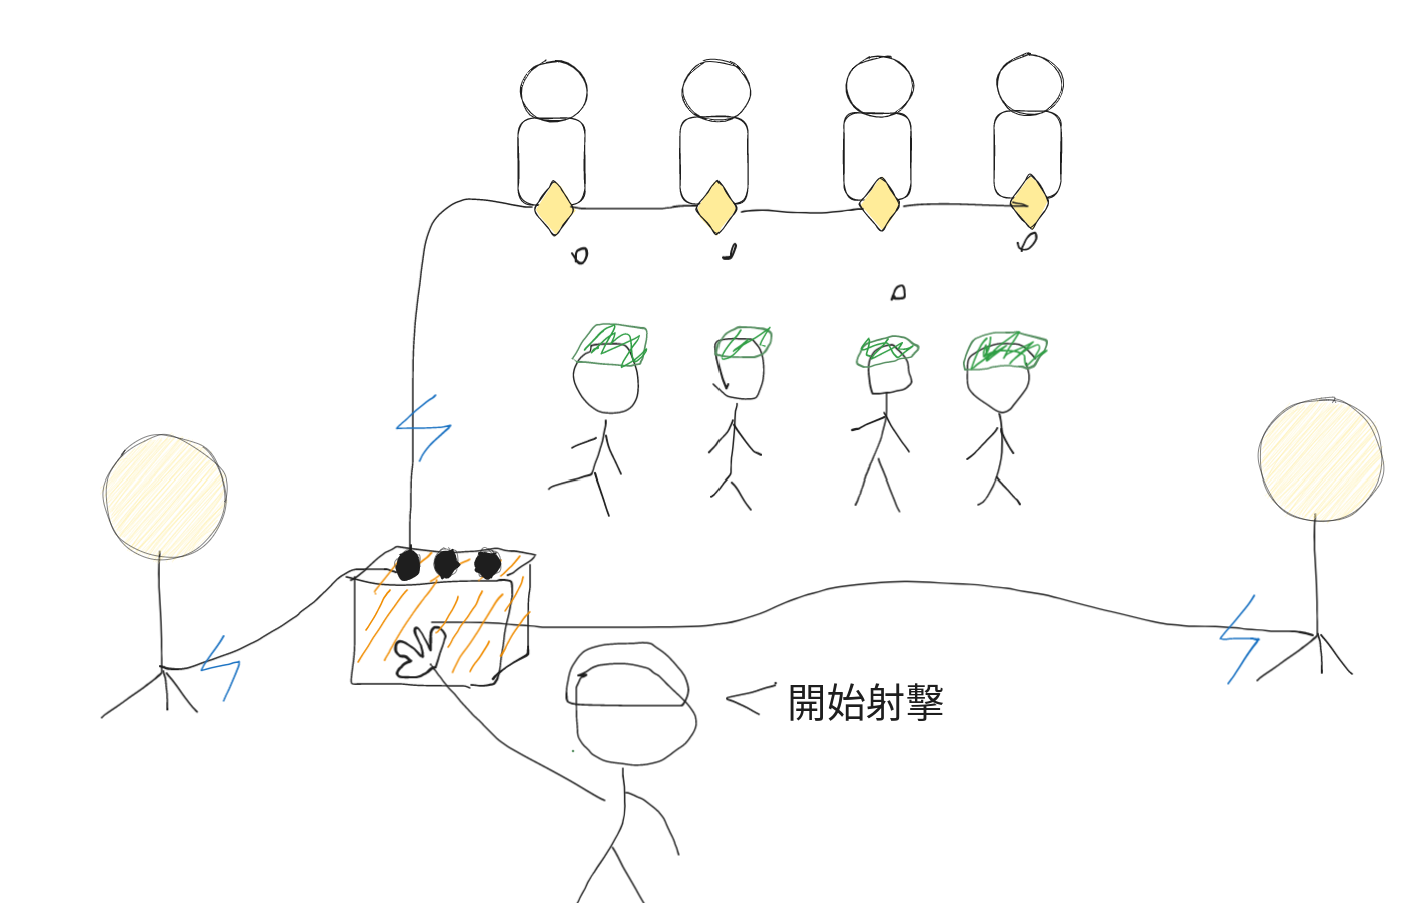
夜間射擊的運作方式和白天打靶很像,差別在於要在幾乎全黑的情況下打靶,靶的下方會安裝微弱的照明(弱弱的燈泡),在開始射擊之後每次會亮 3 秒、暗兩秒,重複五次,射擊的人要按照節奏打完 5 發子彈。
為了達到「計時開關」的需求,以前是把電源接到由斷路器和計時器所接成的控制盒(普累嘎)上,按按鈕控制計時器運作,比較像是用電路和機械元件來做到計時的效果,但這種裝置通常整體的體積很大,而且看起來不夠「酷」,所以營長一開始想要我們設計一個「由晶片計時(寫程式)、遠端控制、手機控制(可以用滑的)」之類的功能,他的想像是要做到智慧家電那樣可以透過程式去控制靶場的燈。不管這聽起來有多麼沒必要,反正只要能讓自己有面子就可以了。
需求
在經過一連串的討論之後,我們把需求簡化成 7 個輸入控制繼電器開關 4 組燈(靶燈、場燈…共四種),分別為
- 四組燈的個別開關
- 全開 + 全關
- 計時開始(靶燈亮 3 秒,暗 2 秒 共五次)
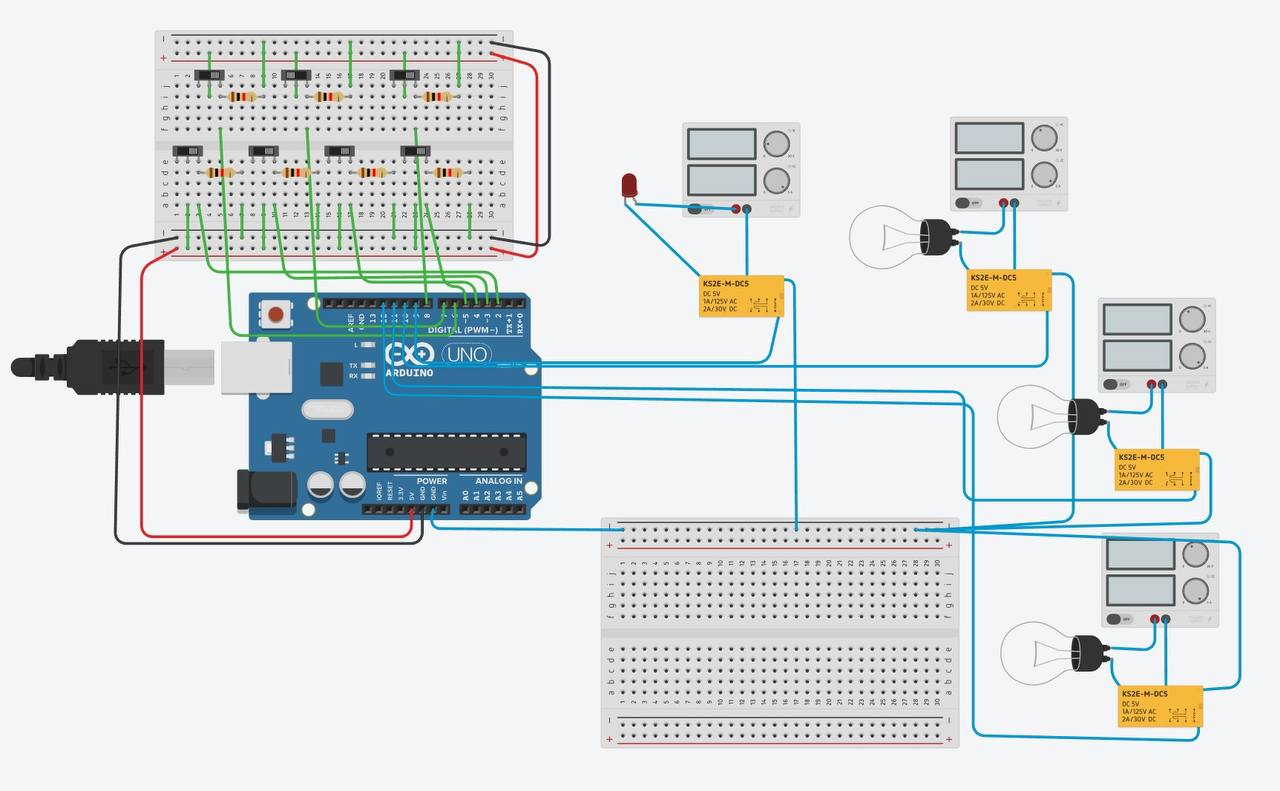
為了達到用晶片寫程式、減小體積、預算低的需求,我們後來選擇用 Arduino 直接硬做一發。

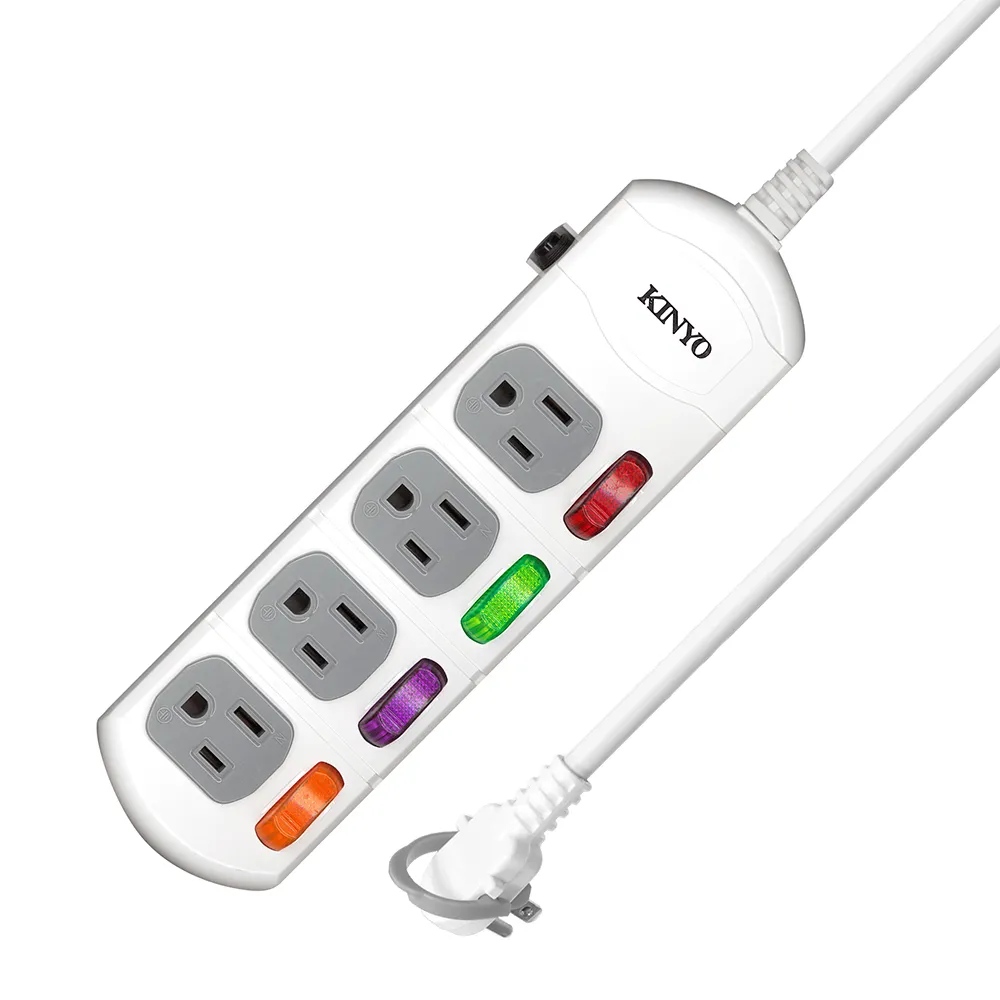
其實簡單可以理解成用「晶片控制的延長線」,有沒有電通過 = 燈的開關
按鈕版
首先,我們做了一個按鈕的版本,總共接了 7 個按鈕,4個繼電器。
問題 A:按鈕在物理上有接通與不接通的情況,所以要以「狀態變化」當作按鈕有沒有被按下,而不是有無接通
- 儲存每一個按鈕的初始狀態,當狀態改變代表有被按下
- 儲存每一個燈的狀態,根據不同的輸入改變狀態(例如:關變開、開變關)
問題 B:關於計時這件事,不能用 delay() 而是要去記錄 millis() 的時間差
- 因為在 delay 時程式是暫停的,不能處理其他 input
- 設計上在計時模式的過程中,如果按了全開或全關(例如有突發狀況),會暫停計時
const int N_BUTTONS = 7;
const int N_LIGHTS = 4;
const int button_pins[7] = {2,3,4,5,6,7,8};
const int light_pins[4] = {9, 10, 11, 12};

int last_button_state[7] = {0,0,0,0,0,0,0};
int physical_button_state[7] = {0,0,0,0,0,0,0};
int light_state[4] = {0, 0, 0, 0};
bool is_shooting = false;
unsigned long shooting_start = 10e6;

void read_physical_button_state(){
  for(int i=0; i<N_BUTTONS; i++){
    physical_button_state[i] = digitalRead(button_pins[i]);
  }
}

int detect_change(){
  // 0, 1, 2, 3 分別是每個燈泡個別亮暗
  // 4, 5 全開 / 全關
  // 6 計時模式

  read_physical_button_state();
  for(int i=0; i<N_BUTTONS; i++){
    if(last_button_state[i] != physical_button_state[i]){
      last_button_state[i] = physical_button_state[i];
      return i;
    }
  }
  return -1;
}

void setup(){
  Serial.begin(9600);

  for(int i=0; i<N_BUTTONS; i++){
    pinMode(button_pins[i], INPUT_PULLUP);
  }
  for(int i=0; i<N_LIGHTS; i++){
    pinMode(light_pins[i], OUTPUT);
  }

  read_physical_button_state();
  for(int i=0; i<N_BUTTONS; i++){
    last_button_state[i] = physical_button_state[i];
    // Serial.print(last_button_state[i]);
    // Serial.print(", ");
    // Serial.print(physical_button_state[i]);
    // Serial.print("\n");
  }
}

void set_light_state(int pin, int state){
  digitalWrite(light_pins[pin], state);
  light_state[pin] = state;
}


void loop(){

  int change = detect_change();

  if(change >= 0){
    Serial.println(change);
  }

  if(change == -1){
    // no change
  }else if((change >= 0 && change <= 3) && !is_shooting){
    set_light_state(change, !light_state[change]);

  }else if(change == 4){
    // all open
    for(int i=0; i<N_LIGHTS; i++){
      set_light_state(i, HIGH);
    }
    is_shooting = false;
    shooting_start = 10e6;
  }
  else if(change == 5){
    // all close
    for(int i=0; i<N_LIGHTS; i++){
      set_light_state(i, LOW);
    }
    is_shooting = false;
    shooting_start = 10e6;
  }else if(change == 6){
    // shooting
    is_shooting = true;
    shooting_start = millis();
  }


  if(is_shooting){
    unsigned long now = millis();
    if(now - shooting_start < 3000){
      for(int i=0; i<N_LIGHTS; i++){
        set_light_state(i, LOW);
      }
    }else if(now - shooting_start < 6000){
      set_light_state(0, HIGH);
    }else if(now - shooting_start < 8000){
      set_light_state(0, LOW);
    }else if(now - shooting_start < 11000){
      set_light_state(0, HIGH);
    }else if(now - shooting_start < 13000){
      set_light_state(0, LOW);
    }else if(now - shooting_start < 16000){
      set_light_state(0, HIGH);
    }else if(now - shooting_start < 18000){
      set_light_state(0, LOW);
    }else if(now - shooting_start < 21000){
      set_light_state(0, HIGH);
    }else if(now - shooting_start < 23000){
      set_light_state(0, LOW);
    }else if(now - shooting_start < 26000){
      set_light_state(0, HIGH);
    }else if(now - shooting_start < 29000){
      set_light_state(0, LOW);
    }else{
      is_shooting = false;
      shooting_start = 10e6;
      set_light_state(0, LOW);
      set_light_state(1, HIGH);
      set_light_state(2, HIGH);
      set_light_state(3, HIGH);
    }
  }

  delay(300);
}
觸控版
為了讓整個設備可以變得更酷一點,我們發現 Arduino 有觸控螢幕的模組(但很難買)可以直接插上去,所以就有了觸控的版本。
- 參考:【Arduino進階教學課程】驅動 ILI9486 TFT 全彩3.5吋LCD顯示螢幕
- https://www.youtube.com/watch?v=9Ms59ofSJIY&pp=ygUPdGZ0IGxjZCBhcmR1aW5v
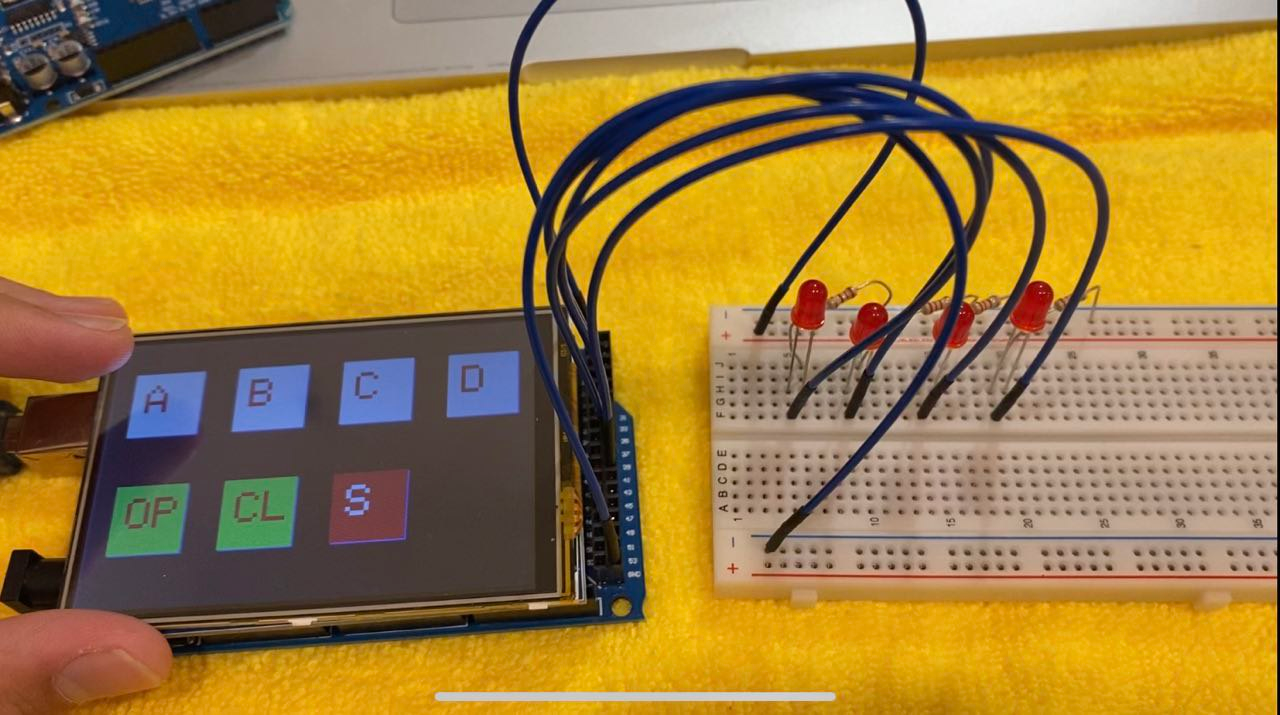
用 【Arduino進階教學課程】驅動 ILI9486 TFT 全彩3.5吋LCD顯示螢幕 裡面的範例程式去改,就電路上來說還比按鈕版的簡單(因為不用接 7 個按鈕出來),觸控板可以直接插到 Uno 或 Mega 板上。
- 雖然可以省下 7 個按鈕的線路,但畫 UI 要研究一下每個按鈕的位置
- 觸控 Input 的 x,y 座標和畫出來的位置有點不一樣,要實際去測試
#include <TouchScreen.h> //touch library
#include <LCDWIKI_GUI.h> //Core graphics library
#include <LCDWIKI_KBV.h> //Hardware-specific library

LCDWIKI_KBV my_lcd(ILI9486,A3,A2,A1,A0,A4); //model,cs,cd,wr,rd,reset

                             /*  r     g    b */
#define BLACK        0x0000  /*   0,   0,   0 */
#define BLUE         0x001F  /*   0,   0, 255 */
#define RED          0xF800  /* 255,   0,   0 */
#define GREEN        0x07E0  /*   0, 255,   0 */
#define CYAN         0x07FF  /*   0, 255, 255 */
#define MAGENTA      0xF81F  /* 255,   0, 255 */
#define YELLOW       0xFFE0  /* 255, 255,   0 */
#define WHITE        0xFFFF  /* 255, 255, 255 */
#define NAVY         0x000F  /*   0,   0, 128 */
#define DARKGREEN    0x03E0  /*   0, 128,   0 */
#define DARKCYAN     0x03EF  /*   0, 128, 128 */
#define MAROON       0x7800  /* 128,   0,   0 */
#define PURPLE       0x780F  /* 128,   0, 128 */
#define OLIVE        0x7BE0  /* 128, 128,   0 */
#define LIGHTGREY    0xC618  /* 192, 192, 192 */
#define DARKGREY     0x7BEF  /* 128, 128, 128 */
#define ORANGE       0xFD20  /* 255, 165,   0 */
#define GREENYELLOW  0xAFE5  /* 173, 255,  47 */
#define PINK         0xF81F  /* 255,   0, 255 */

/******************* UI details */
#define BUTTON_R 35 //the radius of button
#define BUTTON_SPACING_X 35 //the horizontal distance between button
#define BUTTON_SPACING_Y 10  //the vertical distance between button
#define EDG_Y 10 //lower edge distance
#define EDG_X 20 //left and right distance

#define YP A3  // must be an analog pin, use "An" notation!
#define XM A2  // must be an analog pin, use "An" notation!
#define YM 9   // can be a digital pin
#define XP 8   // can be a digital pin

//touch sensitivity for X
#define TS_MINX 906
#define TS_MAXX 116

//touch sensitivity for Y
#define TS_MINY 92
#define TS_MAXY 952

// We have a status line for like, is FONA working
#define STATUS_X 10
#define STATUS_Y 65

//touch sensitivity for press
#define MINPRESSURE 10
#define MAXPRESSURE 1000

TouchScreen ts = TouchScreen(XP, YP, XM, YM, 300);

int light_state[4] = {0, 0, 0, 0};
bool is_shooting = false;
unsigned long shooting_start = 10e6;
int prev_second = -3000;
const int light_pins[4] = {35, 37, 39, 41};
const int N_BUTTONS = 7;
const int N_LIGHTS = 4;

typedef struct _button_info
{
    String button_name;
    uint8_t button_name_size;
    uint16_t font_color;
    uint16_t button_color;
    uint16_t button_x;
    uint16_t button_y;
}button_info;

button_info buttons[7] = {
  "A", 4, RED, WHITE, 25, 40,
  "B", 4, RED, WHITE, 145, 40,
  "C", 4, RED, WHITE, 265, 40,
  "D", 4, RED, WHITE, 385, 40,

  "OP", 4, RED, GREEN, 25, 180,
  "CL", 4, RED, GREEN, 145, 180,

  "S", 4, WHITE, RED, 265, 180,
};

void draw_button(String str, uint16_t x, uint16_t y, uint16_t font_color, uint16_t background_color, bool active){
  if(active){
    my_lcd.Set_Draw_color(YELLOW);
    my_lcd.Fill_Rect(x, y, 80, 80, YELLOW);
  }else{
    my_lcd.Set_Draw_color(WHITE);
    my_lcd.Fill_Rect(x, y, 80, 80, background_color);
  }

  my_lcd.Set_Text_Mode(1);
  my_lcd.Set_Text_Size(5);
  my_lcd.Set_Text_colour(font_color);
  my_lcd.Print_String(str, x+15, y+15);
}

int detect_press(uint16_t x, uint16_t y){
  for(int i=0; i<N_BUTTONS; i++){
    if(
      (x >= (buttons[i].button_x-5) && x <= (buttons[i].button_x + 85)) &&
      (y >= (buttons[i].button_y-5) && y <= (buttons[i].button_y + 85))
    ){
      return i;
    }
  }
  return -1;
}

void set_light_state(int i, int state){
  digitalWrite(light_pins[i], state);

  if(light_state[i] != state){
    draw_button(buttons[i].button_name, buttons[i].button_x, buttons[i].button_y, buttons[i].font_color, buttons[i].button_color, state);
  }
  light_state[i] = state;
}

void setup(void)
{
  Serial.begin(9600);
  my_lcd.Init_LCD();
  Serial.println(my_lcd.Read_ID(), HEX);
  my_lcd.Fill_Screen(BLACK);
  my_lcd.Set_Rotation(1);

  for(int i=0; i<N_LIGHTS; i++){
    pinMode(light_pins[i], OUTPUT);
  }

  for(int i=0; i<N_BUTTONS; i++){
    my_lcd.Set_Draw_color(BLUE);
    my_lcd.Fill_Rect(buttons[i].button_x+2, buttons[i].button_y+2, 80, 80, BLUE);
    draw_button(buttons[i].button_name, buttons[i].button_x, buttons[i].button_y, buttons[i].font_color, buttons[i].button_color, false);
  }
}

void loop(void)
{
  digitalWrite(13, HIGH);
  TSPoint p = ts.getPoint();
  digitalWrite(13, LOW);

  pinMode(XM, OUTPUT);
  pinMode(YP, OUTPUT);
  if (p.z > MINPRESSURE && p.z < MAXPRESSURE)
  {

    p.x = map(p.x, TS_MINX, TS_MAXX, my_lcd.Get_Display_Width(),0) - 10;
    p.y = int(1.05 * (310 - map(p.y, TS_MINY, TS_MAXY, my_lcd.Get_Display_Height(),0)));

    Serial.print(p.x);Serial.print(", ");Serial.print(p.y);Serial.print("\n");

    int press = detect_press(p.x, p.y);
    if (press >= 0){
      Serial.println(press);
    }

    if (press == -1){
      // do nothing
    }else if((press >= 0 && press <= 3) && !is_shooting){
      set_light_state(press, !light_state[press]);
    }else if(press == 4){
      // all open
      for(int i=0; i<N_LIGHTS; i++){
        set_light_state(i, HIGH);
      }
      is_shooting = false;
      draw_button("", 385, 180, BLACK, BLACK, false);
    }else if(press == 5){
      // all close
      for(int i=0; i<N_LIGHTS; i++){
        set_light_state(i, LOW);
      }
      is_shooting = false;
      draw_button("", 385, 180, BLACK, BLACK, false);
    }else if(press == 6){
      // shooting
      is_shooting = true;
      shooting_start = millis();
    }
  delay(300);
  }


  if(is_shooting){
    unsigned long now = millis();

    // counting
    if (int((now-shooting_start)/1000)-3 != prev_second){
      draw_button(String(int((now-shooting_start)/1000)-3), 385, 180, RED, BLACK, false);
      prev_second = int((now-shooting_start)/1000)-3;
    }

if(now - shooting_start < 3000){
      for(int i=0; i<N_LIGHTS; i++){
        set_light_state(i, LOW);
      }
    }else if(now - shooting_start < 6000){
      set_light_state(0, HIGH);
    }else if(now - shooting_start < 8000){
      set_light_state(0, LOW);
    }else if(now - shooting_start < 11000){
      set_light_state(0, HIGH);
    }else if(now - shooting_start < 13000){
      set_light_state(0, LOW);
    }else if(now - shooting_start < 16000){
      set_light_state(0, HIGH);
    }else if(now - shooting_start < 18000){
      set_light_state(0, LOW);
    }else if(now - shooting_start < 21000){
      set_light_state(0, HIGH);
    }else if(now - shooting_start < 23000){
      set_light_state(0, LOW);
    }else if(now - shooting_start < 26000){
      set_light_state(0, HIGH);
    }else if(now - shooting_start < 29000){
      set_light_state(0, LOW);
    }else{
      is_shooting = false;
      shooting_start = 10e6;
      set_light_state(0, LOW);
      set_light_state(1, HIGH);
      set_light_state(2, HIGH);
      set_light_state(3, HIGH);
      draw_button(String(int((now-shooting_start)/1000)), 385, 180, BLACK, BLACK, false);
    }
  }
}
好險我退了
除了天馬行空的需求外,由於不能在營區用電腦,所以只能用假日的時間回家弄(在營區外用電腦燒程式到 Arduino),雖然可以放榮譽假(夭兩),但距離退伍只剩 3 次週末,吸引力其實滿小的(最後也只放到一次夭兩),加上在營區很難外出買材料,只要缺一兩樣東西,就會讓整個進度卡住。
最後,神奇的是,除了電機組的同梯在電路規劃和焊接上一次到位外,我回家寫的程式也沒有出包,讓整個任務在兩週內就順利完成,而且測試時也沒有出包(讓營長在旅長和軍團幹部面前秀了一波),雖然整體的設計並不困難,但在一個很特殊的環境裡用很苛刻的條件完成一件讓長官好大喜功事,能在退伍前有這樣的插曲也是很難得的經驗,雖然內心都在想只要退伍就不關我的事了,但可以感覺到每個人都希望能把這個東西做到最好,也用最龜毛的態度在焊接或是 Debug,在退伍前幾天營長也很開心的要和我們合照(用營區專用的相機),要把這個照片放到回憶牆上做紀念,可以見得這個東西做出來讓他真的很爽。